Diagnostics
Visual Field Testing: How to Avoid Fixation Losses
Basic steps can protect against test inaccuracies.
By Dianna E. Graves, COMT
Growing up, one of my teachers would announce loudly to our class: “The devil is in the details!”
While my fifth-grade classmates didn’t know what that meant, we did know when she said it, one of us had gone astray.
Now I know what she was teaching us. Neglecting small details can lead to larger issues. This holds true for visual field testing. It’s too easy to ignore the basics of performing the test and opt instead to only pay attention to the grey scale end result of the field and the standard deviations of the defect.
To perform a reliable visual field test, make sure the patient understands his or her role in the testing and is observed by the technician to ensure they are doing that job correctly.
There are a number of different methods to perform a visual field – from the very basic confrontation fields to advanced perimetry.
Different Methods
Confrontation fields are the most common method used during routine eye examinations and are considered basic because they usually can only be counted on to detect large defects (i.e. hemianopsia).
With Goldmann and Automated Visual fields, the issue of fixation comes into play even more. While the fixation monitors are different between the HVF (automated) perimeters and the Goldmann style perimeters (GVF), this article will focus more on the automated perimeters.

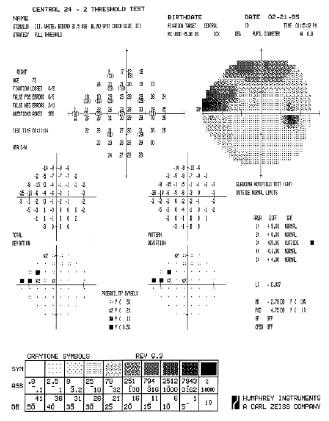
Figure 1: In This example, the blind spot is located on the right side of the paper, on the horizontal raphe, indicating this is the patient’s right eye.
Automated field analyzers use the Heijl–Krakau blind spot monitoring method, called the blind spot because there are no photoreceptors on the optic disc. This provides a reading of the quality of the patient’s fixation by periodically shining a light stimulus into the blind spot area and then measuring if the patient responds. If the machine shines a stimulus into the blind spot 10 times and the patient responds to four of those stimuli, it would be recorded as: 4/10 xx. A response to the stimulus tells us they are not fixating on the fixation area.
Finding the Blind Spots
Each eye has a blind spot that corresponds to the optic nerve head, where the absence of photoreceptors produces an absolute scotoma roughly 10°-15° temporal to the fovea. It is located on the horizontal raphe on the side of the eye. Fixation can be tested by mapping the blind spot and then retesting it. If the patient shifts his or her eye, the machine will detect a fixation loss (Figure 1).

Figure 2: For a HVF test to be considered reliable, both the false positive and false negative errors should be less than 33%. This example shows 2/11 false negative errors.
After the test begins, the machine will randomly return to the blind spot to ensure the patient is not “cheating” and trying to follow the light stimulus. For the visual field to be considered a reliable test, fixation losses should be less than 10%. Fixation losses are usually caused by the patient’s wandering eyes, but can also indicate dragged disc syndrome, high myopia, or trauma.
Fixation Loss Troubleshooting
If the number of fixation losses begins to get higher than three losses early in the testing process, I recommend stopping the test and re-plotting the blind spot area. The machine will perform a short test showing the stimulus in the area where it expects the blind spot to be until the true blind spot is re-mapped. Then, the test will resume. Continuing to test with high numbers of fixation losses only ends up giving the doctor an invalid test with numbers that cannot be guaranteed accurate.
If a patient continues to have fixation losses, but appears to be maintaining fixation, try decreasing the test size of the stimulus.
The visual field machine has “standard” parameters to which it defaults. The stimulus size for most machines is the II4e. For the average patient with good vision, that is a very large spot size.
While patients may look like they are maintaining straight-ahead fixation, they may actually be scanning from side to side of the fixation area and because of the spot size – may pick it up easier. This can be detected during the initialization period as a fixation loss. Pause the test, go to “change parameters” and change the stimulus size to I4e or I3e. Make sure you mark on your visual field sheet that you’ve changed the stimulus size parameter so the next technician stays consistent with your patterns.
False Positives/False Negatives
Two other measures of fixation reliability with automated visual fields are false positives and false negatives.
False positives occur if the patient is “trigger happy.” This occurs when the patient responds at a time when no stimulus is being presented to the patient. They press the button to the noise of the machine and not to the actual light stimulus. This is registered as a false positive error.
False negative errors are recorded when a patient could not see a bright stimulus in the same spot they previously saw a dim stimulus. These can occur because the patient is not paying attention or is becoming fatigued with the test (Figure 2).
Ensuring basic steps are carried out before the major visual field testing occurs will ensure the test is reliable. While the machine may be automated, the technician is an integral part of the process. The machine will only be as good as you make it. It’s the technician’s duty to help to ensure the patient has the best possible experience, as well as the best potential to produce a reliable, reproducible test for the doctor to use. OP


